Step by step guide to deploying spring boot application on Google Cloud Run
In this tutorial we will see how to setup a low cost CI/CD pipeline to deploy your simple Spring boot app on Google Cloud Run. Cloud Run is a Google Cloud Platform product which allows you to run your containerized app on managed cluser of nodes. The benefit of Cloud Run is that you only pay for the CPU and Memory you actually use and hence you can save money if your site is really low traffic. Spring boot is a java based microservices framework but is also very powerful to run a full stack application.
Table of contents
Setup your repository on Github
We will use Github to host our code repository. This repository can be public or private. It does not matter. If you do not have a repository, I suggest you simply clone this repository. This is a simple spring boot app. However, if you already have a Spring Boot app then you can also use that repository as well.
Setup you Google Cloud Account
If you do not already have a google cloud account, I recommend you create one. It is a simple process and requires a credit card. Google also gives you $200 bonus so you will have enough money to run this application.
Create a Project
Google Cloud Platform has a concept of Project. A project should map to a real world project you are working on. Each project will be billed separately and you can delete a project and all associated services with it pretty quickly.
Follow these instructions to create a new project. It does not matter what name you pick for your project.
You do not want to accidently consume too much resources and get a surprise credit card bill. For this make sure you setup a billing alert for a reasonable amount like $100.
Install gcloud command line tool.
We do recommend installing gcloud command line tool as an optional step. With this tool you can do many things with a simple command which otherwise would take you lot longer to do through the web UI.
- Install the gcloud cli by following these steps.
- Set it up with the right credentials so it is actually usable.
Prepare your repository for containerization
What is a container ?
If you are not familiar with Docker container images, I can explain it in few sentences. When you develop a Spring Boot app (or any other server app) you expect to run it in certain environment. For example Linux so and so version, with so and so java version installed, with so and so environment variables and such. Dockerfile is a way you describe this environment and how to build and run your app.
Any cloud platform that can understand this container can look at your Dockerfile and precisely create this exact environment to run your app. You never have to worry about the OS, hardware and any surprise updates to OS or underlying software.
A Dockerfile precisely and exhaustively defines the state of the machine in which your app is going to run.
Add a Dockerfile to your repository's root folder.
Create a file Dockerfile in your repository and add the following content to it.
This file is basically very simple to understand. The first line tells us which is the base state of our machine. gradle:jdk21-alpine is a publicly available gradle image with alpine linux distro. Basically someone has already installed gradle and jdk21 for us on an Alpine Linux kernel and provided us this base image.
We use this base image and then compile our code on that image and provide commands to run the app.
RUN indicates that a command to be run on this image.
COPY command indicates that something is being copied from the repository to this image.
ENV command indicates that we are setting an environment variable on this server now.
The final line in this file is CMD which indicates the commmand to be run to prepare the image to serve traffic.
You can read more about these Dockerfile directives here.
Setting up Google Cloud Run
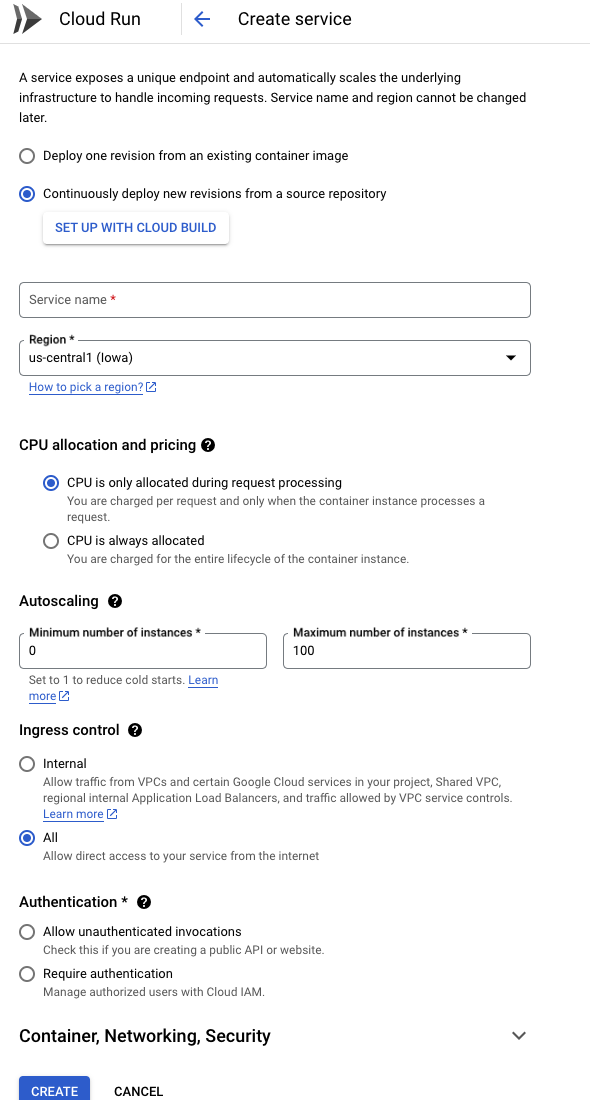
- Visit Google Cloud Run page and click on Create Service.
- A long form will come up. Select the option Continuously deploy new revisions from a source repository.
- Click on the Setup with Cloud Build button which opens up a Wizard.
- In this Wizard you can connect you Github account with Google Cloud, select the repository you created and pick "Dockerfile" as an option.
- Select allow unauthenticated invocations in the form and press save.
- Everything else can stay default though I prefer to keep "minimum number of nodes" to zero to keep my costs low.
The following image should give you an idea.
Wait for the app to get deployed on Cloud Run
As soon as you have created the cloud run service, it will execute the build trigger which will automatically fetch the latest code from your repo and create an image using the Docker file you created earlier.
It will deploy that image to Cloud Run automatically.
The public URL for your cloud run endpoint will be displayed after the service is created. It is often of the form : https://service_name-random_string-region_code.a.run.app
You can click on this link and see you app running. If you want a custom domain for this app it is possible to add one. Please see the instructions to map your domain name to cloud run.
Note that Google does not allow custom domains if your Cloud Run service is in some regions like Mumbai. In those cases you will have to use Firebase forwarding service (free) or a load balancer (expensive).
Troubleshooting
Like all things devops things may not work smoothly in the first run. Following things can go wrong.
Cloud build fails
To check whether the build itself was successful you can visit Google Cloud Build page. Here you can see the history of all builds that were triggered and the logs. If something went wrong you will see it in logs.
Most of the times what can go wrong is actually something in your Dockerfile or spring boot build step.
You can always run spring boot locally to test.
Fix the issues, commit your code and push to Github. Google Cloud build will automatically trigger another build by detecting this push.
Cloud run deployment fails
One of the most common reason for this failure is that you might not have set the environement variables in Dockerfile properly or the resources like memory was too less. However for this particular project I do not think you will face any issus.
Adding more features to the spring boot app
What if you want to add mysql to this app ? This is very simple. Simply update your application.properties file with all the neccessary variables.
Things you can consider doing when deploying to Google Cloud Run.
- Use Google Cloud Storage to store uploaded files in your app.
- Use Google Cloud Sql to use a mysql like RDBMS.
- Use Sendgrid to send emails from your nextjs app.
Performance
Note that Google will keep the nodes 0 when there is no traffic. When the first request comes in, Google will bring up a new node and run it. This might take time. So the first request would be relatively slower. But subsequent requests are fast enough.
You can avoid this problem by configuring Cloud Run to keep at least one node alive all the time but then you will end up paying for it 24x7.
When not to consider Cloud Run
While cloud run is an excellent service to run basic apps cheaply, it is lot more expensive than just running things on a virtual machine or Google's full fledges Kubernetes service Anthos. If your site has traffic nearly 247 I would recommend go for one of those solutions rather than Cloud Run.
Spring boot is well suited for containerization so that when you want to scale you can simply increase the number of nodes.
Alternative way.
Google cloud run also allows you to provide a config.yml file and describe to Google Cloud what steps you want to take whenever Google cloud sees a new commit on your repository. This way you can specify more complex setups when the deployment happens.
Here is a sample config.yml file.
This file when you setup properly, will tell Google Cloud to first build a new Docker image using the Dockerfile and then run the steps that deploy it on Cloud Run. This is esepcially useful when you might want to deploy the same code to multiple cloud run services, or do cleanup operations like setting up new databases etc.
Summary
Cloud run is really simple to setup with when building a spring boot app. Also, this is not the only way to do it. There are other ways to do this setup as well including the very popular "Run on Google Cloud" button method described in this blog post.
Cloud run can be used very cost effectively to host low traffic small scale webapps or even larger ones if you deploy them correctly.